Elevate Your Interior: The Beauty of Enamel Semi-Gloss Trim
February 14, 2025
Painting Your Interior Trim with Enamel Semi-Gloss
Painting your interior trim might seem like a small detail, but it can make a world of difference in the overall look and feel of your home. Choosing the right paint and finish is key to achieving a polished and professional result. In this post, we'll explore the benefits of using enamel semi-gloss paint for your interior trim and offer some tips for achieving a flawless finish.
Why Choose Enamel Semi-Gloss for Trim?
Enamel semi-gloss paint is a popular choice for interior trim for several reasons:
- Durability: Enamel paints are known for their exceptional durability. They form a hard, protective layer that resists scratches, scuffs, and chips, making them ideal for high-traffic areas like baseboards, door casings, and window sills. This is especially important in homes with kids or pets!
- Cleanability: The semi-gloss finish is smooth and easy to clean. Dirt, grime, and fingerprints wipe away effortlessly, keeping your trim looking fresh and new for longer. This is a major plus compared to flat or satin finishes that can be harder to clean.
- Moisture Resistance: Enamel paints offer excellent moisture resistance, making them suitable for bathrooms, kitchens, and other areas prone to humidity. They help prevent water damage and mold growth.
- Aesthetic Appeal: Semi-gloss trim adds a touch of elegance and sophistication to any room. The subtle sheen highlights the details of the trim, creating a beautiful contrast against the walls (especially if the walls are a matte or eggshell finish).
Preparing Your Trim for Painting
Proper preparation is essential for achieving a smooth and long-lasting finish. Here's a step-by-step guide:
- Cleaning: Thoroughly clean the trim to remove any dirt, dust, grease, or grime. Use a mild detergent and a damp cloth.
- Sanding: Lightly sand the trim to create a smooth surface for the paint to adhere to. Use fine-grit sandpaper (220-grit is a good starting point). If the trim has a glossy finish, you may need to use a slightly coarser grit to dull the surface.
- Filling Holes and Dents: Fill any nail holes or dents with wood filler. Let it dry completely and then sand smooth.
- Caulking: Apply caulk to any gaps or cracks in the trim. This will create a seamless finish and prevent moisture from getting behind the trim.
- Priming: Priming is crucial, especially if you're painting bare wood or changing the color significantly. Use a high-quality primer designed for enamel paint. Let it dry completely according to the manufacturer’s instructions.
Painting Your Trim
- Apply the First Coat: Apply a thin, even coat of enamel semi-gloss paint using a high-quality brush or roller. Avoid drips and runs.
- Let it Dry: Allow the paint to dry completely according to the manufacturer’s instructions.
- Lightly Sand: Lightly sand the trim with fine-grit sandpaper to smooth out any imperfections.
- Apply the Second Coat: Apply a second thin coat of paint. This will ensure full coverage and a smooth, even finish.
- Let it Dry Completely: Allow the paint to dry completely before handling the trim.
Tips for a Flawless Finish
- Choose the Right Tools: Invest in high-quality brushes and rollers designed for enamel paint.
- Work in a Well-Ventilated Area: Enamel paints can have strong fumes, so it's important to work in a well-ventilated area.
- Don't Overload Your Brush: Dip your brush in the paint and then tap off any excess to prevent drips.
- Apply Thin Coats: Multiple thin coats are better than one thick coat. This will prevent drips and runs and ensure a smooth finish.
- Be Patient: Allow the paint to dry completely between coats. Rushing the process can lead to imperfections.
Reel Painters LLC: Your Trim Painting Experts
If you're looking for professional results, consider hiring a professional painter. At Reel Painters LLC, we have the experience and expertise to transform your interior trim with a beautiful and durable enamel semi-gloss finish. Contact us today for a free estimate!
When it comes to elastomeric exterior painting in Florida, most homeowners hear quotes ranging from $8–$10 per square foot. While elastomeric coatings are worth the investment for their unmatched protection, that price can make some homeowners hesitate. At Reel Painters LLC, we believe you shouldn’t have to overpay to get the best. That’s why our average pricing comes in at about $2 less per square foot than most other elastomeric painting companies — without cutting corners on quality, prep work, or materials. What is Elastomeric Paint and Why is it Priced Higher? Elastomeric coatings are 5–10 times thicker than standard house paint. They: Form a flexible, waterproof barrier against rain and humidity. Bridge and seal hairline cracks to prevent water intrusion. Provide long-lasting UV and fade resistance. Last 10–15 years in Florida’s climate when properly applied. The higher material cost and the skill required to apply it correctly are why many companies charge more. But higher cost doesn’t always mean better quality. How Reel Painters LLC Delivers Premium Elastomeric at a Better Price Efficient Processes – Our experienced crews know how to work smart without rushing the job. Trusted Vendor Relationships – We secure premium Sherwin-Williams and Benjamin Moore elastomeric coatings at competitive prices. No Excessive Overhead – We keep our business lean so our customers don’t pay for unnecessary markups. Local Expertise – We know how to prep Florida homes to maximize elastomeric performance without wasting materials. Example Savings If your home needs 2,500 sq. ft. of exterior coverage: Other Companies: $8–$10/sq. ft. → $20,000–$25,000 Reel Painters LLC: Around $6–$8/sq. ft. → $15,000–$20,000 That’s $5,000 or more back in your pocket — while still getting expert application, premium products, and long-lasting protection. Why Florida Homeowners Trust Reel Painters LLC for Elastomeric Coatings Over a decade of painting experience on the Treasure Coast. Licensed & insured for peace of mind. Serving Vero Beach, Sebastian, Fort Pierce, Hutchinson Island, Port St. Lucie, Jensen Beach, Jupiter, and Okeechobee. 5-star customer reviews highlighting quality, professionalism, and fair pricing.The body content of your post goes here. To edit this text, click on it and delete this default text and start typing your own or paste your own from a different source.
When it comes to professional painting services in Florida, no one delivers quality, durability, and beauty like Reel Painters LLC. We are proud to be recognized as Florida’s number one residential and commercial painting company, offering the best service, the best craftsmanship, and the best painting products available. Whether you need interior painting, exterior painting, paver sealing, pool deck coatings, cabinet refinishing, or elastomeric waterproofing, Reel Painters LLC is the trusted choice across Vero Beach, Sebastian, Fort Pierce, Hutchinson Island, Port St. Lucie, Jensen Beach, Jupiter, and Okeechobee. Why Reel Painters LLC is Florida’s Best Painting Company #1 in Quality – Every project is completed with unmatched attention to detail. #1 in Service – We arrive on time, communicate clearly, and exceed expectations. #1 in Products – We use only premium paints and coatings from top brands like Sherwin-Williams, Benjamin Moore, and PPG. #1 in Longevity – Our high-quality coatings can last 10–15 years or more, even in Florida’s harsh climate. Premium Products for Superior Results We don’t believe in cutting corners. At Reel Painters LLC, we choose only the best paints and finishes for long-lasting beauty and protection: Sherwin-Williams Emerald® – Superior durability and washability for interiors. Sherwin-Williams Duration® – Long-lasting exterior protection against UV and salt air. Loxon® XP Elastomeric Coatings – The thickest, most protective coating for Florida stucco and masonry homes. Industrial-Grade Sealers – For pavers, pool decks, and high-wear areas. Using these premium products ensures your home or business not only looks stunning but stays protected for years. Our Comprehensive Painting & Coating Services Interior Painting – Luxury finishes, perfect cut lines, and flawless walls. Exterior Painting – Weatherproof coatings that resist fading, peeling, and cracking. Elastomeric Waterproofing – Seals out moisture and bridges hairline cracks. Paver Sealing – Protects driveways, patios, and walkways from stains and fading. Pool Deck Coatings – Durable, slip-resistant, and beautiful. Cabinet Refinishing – Transform your kitchen or bath with premium enamel finishes. Why Florida Homeowners Choose Reel Painters LLC ✅ Licensed & Insured – Peace of mind with every project. ✅ Local Experts – We know Florida’s climate and how to protect against it. ✅ Free Estimates – Transparent pricing with no hidden fees. ✅ Customer Satisfaction Guaranteed – We don’t leave until you love the results. If you’re searching for: Best Florida Painter #1 House Painter in Vero Beach Top Painting Company Treasure Coast Florida’s Best Exterior & Interior Painter …Reel Painters LLC is the answer.
When it comes to protecting your Florida home, not all paints are created equal. In fact, some coatings are designed to be much thicker, stronger, and more durable than standard exterior paints. The leader in this category? Elastomeric exterior coatings — the thickest, longest-lasting paint solution for residential homes. What Makes Elastomeric the Thickest Paint? Elastomeric coatings are formulated to be 5–10 times thicker than regular house paint. This extra thickness isn’t just for looks — it creates a flexible, waterproof membrane over your home’s surface, sealing out moisture and resisting cracks. This coating stretches and contracts with your home as temperatures change, meaning it can handle Florida’s scorching sun, tropical rains, and occasional cold snaps without peeling or blistering. Benefits of Using the Thickest Paint on Your Home 1. Unmatched Weather Protection The thickness of elastomeric paint provides a robust barrier against harsh elements, from UV rays to wind-driven rain. 2. Superior Crack Bridging Its flexibility allows it to span and seal hairline cracks, preventing water intrusion and structural damage. 3. Longer Life Span While standard exterior paints often last 5–7 years in Florida’s climate, elastomeric coatings can protect your home for 10–15 years or more with proper application. 4. Enhanced Waterproofing Its dense composition creates a shield that keeps moisture out, protecting stucco, concrete block, masonry, and other common Florida home exteriors. 5. Maintains Beauty Over Time The UV resistance helps prevent fading and chalking, keeping your home’s color vibrant for years. Why Thicker is Better for Florida Homes In our climate, your home’s exterior faces constant stress — salt in the air, intense heat, high humidity, and heavy storms. Regular paints can wear down quickly under these conditions, but elastomeric’s thickness means it holds up longer and requires fewer repaints, saving you money over time. How Reel Painters LLC Applies Elastomeric for Maximum Protection At Reel Painters LLC, we take every step to ensure your elastomeric coating is applied for maximum durability and beauty: Inspection & Prep – We thoroughly pressure wash and repair any surface damage. Sealing & Priming – We fill cracks, caulk gaps, and apply a premium bonding primer. Thick, Even Application – We use top-grade elastomeric coatings from trusted brands, applied at the manufacturer’s recommended thickness for optimal performance. Attention to Detail – We ensure complete coverage for a seamless, protective finish. Protect Your Home with the Thickest, Most Durable Paint Available
If you own a home in Florida, you know that the sun, humidity, and coastal conditions can take a toll on your exterior paint. At Reel Painters LLC, we specialize in applying premium elastomeric exterior coatings that not only beautify your home but also provide unmatched long-term protection. What is Elastomeric? Elastomeric is a high-build, flexible coating that is much thicker than traditional exterior paints—often 5–10 times thicker. It’s designed to stretch and contract with your home’s surfaces, which is especially important in Florida’s hot days, cooler nights, and seasonal temperature swings. Unlike standard paints, elastomeric creates a seamless, waterproof barrier that resists cracking, peeling, and blistering. It’s ideal for stucco, masonry, concrete block, and other exterior surfaces that are common here on the Treasure Coast. Benefits of Elastomeric Exterior Coatings 1. Superior Weather Resistance Florida homes face extreme UV rays, salty air, high humidity, and heavy rain. Elastomeric coatings block out moisture, protect against salt intrusion, and shield your home from sun damage. 2. Waterproofing & Crack Sealing Elastomeric coatings can fill and bridge hairline cracks, preventing water from getting behind your exterior walls—a major cause of costly repairs. 3. Long-Lasting Color & Curb Appeal The thickness and UV-resistant properties of elastomeric help maintain vibrant color and a smooth finish far longer than regular exterior paints. 4. Energy Efficiency When paired with lighter colors or reflective technology, elastomeric coatings can help keep your home cooler, reducing heat absorption and lowering energy costs. How Long Does Elastomeric Last? With proper preparation and professional application, elastomeric coatings can protect your home for 10–15 years or more. That’s significantly longer than most traditional exterior paints, which often need repainting in 5–7 years in Florida’s climate. Our Process at Reel Painters LLC At Reel Painters LLC, we don’t cut corners. Our elastomeric application process is designed to give you the best results possible: Detailed Inspection – We examine your home’s exterior for cracks, damage, or problem areas that need repair. Surface Preparation – We pressure wash to remove dirt, mildew, and chalky residue, ensuring the surface is clean and ready for coating. Crack & Surface Repairs – We fill cracks and seal gaps to prevent water intrusion. High-Quality Primer – We apply a primer designed to bond with your home’s surface and ensure the elastomeric adheres properly. Premium Elastomeric Application – Using top-tier products from trusted manufacturers, we apply elastomeric coatings at the proper thickness for maximum protection. Final Touches & Cleanup – We leave your home looking flawless and ready to withstand Florida’s toughest weather. Why Choose Reel Painters LLC? Over a decade of experience in Florida exterior painting and coatings. Serving the Treasure Coast from Sebastian to Jupiter and as far west as Okeechobee. Commitment to quality craftsmanship, premium products, and long-term results. Licensed, insured, and trusted by homeowners throughout Indian River, St. Lucie, and Martin Counties.
If you’re dealing with cracks, dents, holes, or water-damaged drywall in your home, you’re not alone. Many homeowners in Vero Beach, Wabasso, and Orchid Island experience drywall issues due to the region’s unique climate, aging construction, and coastal conditions. At Reel Painters LLC, we provide professional drywall repair services throughout Indian River County, delivering seamless results and flawless finishes every time. Common Drywall Problems in Indian River County Homes Whether you live in a beachfront condo, a ranch-style home, or a modern build in Vero Beach, drywall damage can happen for many reasons: Nail pops and settling cracks in walls and ceilings Door handle dings or furniture scuffs Water damage from roof leaks or AC units Humidity-related bubbling and sagging drywall Improper drywall installation or old patch jobs Holes from plumbing or electrical work These issues are not just unsightly—they can lead to more serious structural or moisture problems if not addressed professionally. Our Professional Drywall Repair Process At Reel Painters LLC, we take pride in offering clean, high-quality drywall repairs that blend perfectly with your existing walls or ceilings. Here’s how we do it: Assessment - We inspect the damage to determine if it’s superficial or deeper (like moisture intrusion). If there’s water involved, we identify the source before repairs. Cut, Patch & Reinforce - We remove any loose or damaged drywall and cut out clean sections. For larger holes, we install reinforcement backing and new drywall pieces. Taping & Mudding - We apply mesh or paper tape and multiple coats of joint compound (mud), feathering it smoothly into the surrounding wall. Sanding & Smoothing - We sand between coats for a flush, invisible repair. Our pros use dust-free sanding equipment to minimize mess. Priming & Painting - The repaired area is primed to seal the surface and match absorption, then painted to blend with the rest of your wall or ceiling using high-quality interior paint. Drywall Repair & Painting in One Go Unlike many handyman services, we’re drywall AND painting pros. That means we don’t just patch—we restore your entire space with a factory-finish look. Whether it’s: Matching your current wall paint Repainting a whole room for a fresh start Repairing and repainting textured ceilings or popcorn removal We’ve got the tools, talent, and experience to get it done right the first time. Why Indian River County Homes Need Professional Drywall Work Living near the coast in places like Orchid Island or Wabasso comes with unique building challenges: Salt air corrosion around window and door frames High humidity and moisture retention inside walls Storm and hurricane season damage Foundation settling in sandy soil zones That’s why choosing a licensed and insured drywall repair contractor in Vero Beach is critical. DIY patches or cheap fixes don’t last—but Reel Painters delivers results built for Florida’s climate. Interior Finishes We Specialize In Flat wall and ceiling repairs Knockdown and orange peel texture matching Smooth skim coat drywall resurfacing Trim and baseboard repair where drywall meets finishes Small hole patching to full room drywall installation Service Areas We proudly offer drywall repair and wall restoration services in: Vero Beach Wabasso Orchid Island Indian River Shores Gifford Winter Beach South Beach Sebastian (upon request) Why Choose Reel Painters LLC for Drywall Repair? 5-star rated drywall repair in Vero Beach Seamless patching and blending Clean, professional, on-time service We prep, patch, and paint—all in one service Trusted by Indian River County homeowners Frequently Asked Questions About Drywall Repair Q: Can you fix drywall cracks in my ceiling too? Yes—we repair ceiling cracks, especially around tape seams and light fixtures. Q: How long does drywall repair take? Small jobs can be done in a day. Larger repairs may require drying time between mud coats and paint. Q: Will the patch be visible? No—our goal is a flawless finish. We feather, sand, prime, and paint to make sure the repair disappears into the surrounding surface. Q: Can you paint the whole room if needed? Absolutely. Many customers choose to refresh their entire room while we’re doing the drywall work. Call Today for a Free Estimate Don’t let a small drywall problem turn into a bigger one. Call Reel Painters LLC at 772-300-6124 or visit www.reelpainters.com to schedule your free, no-pressure estimate. We’ll restore your walls and ceilings to perfection—because every wall deserves a flawless finish.
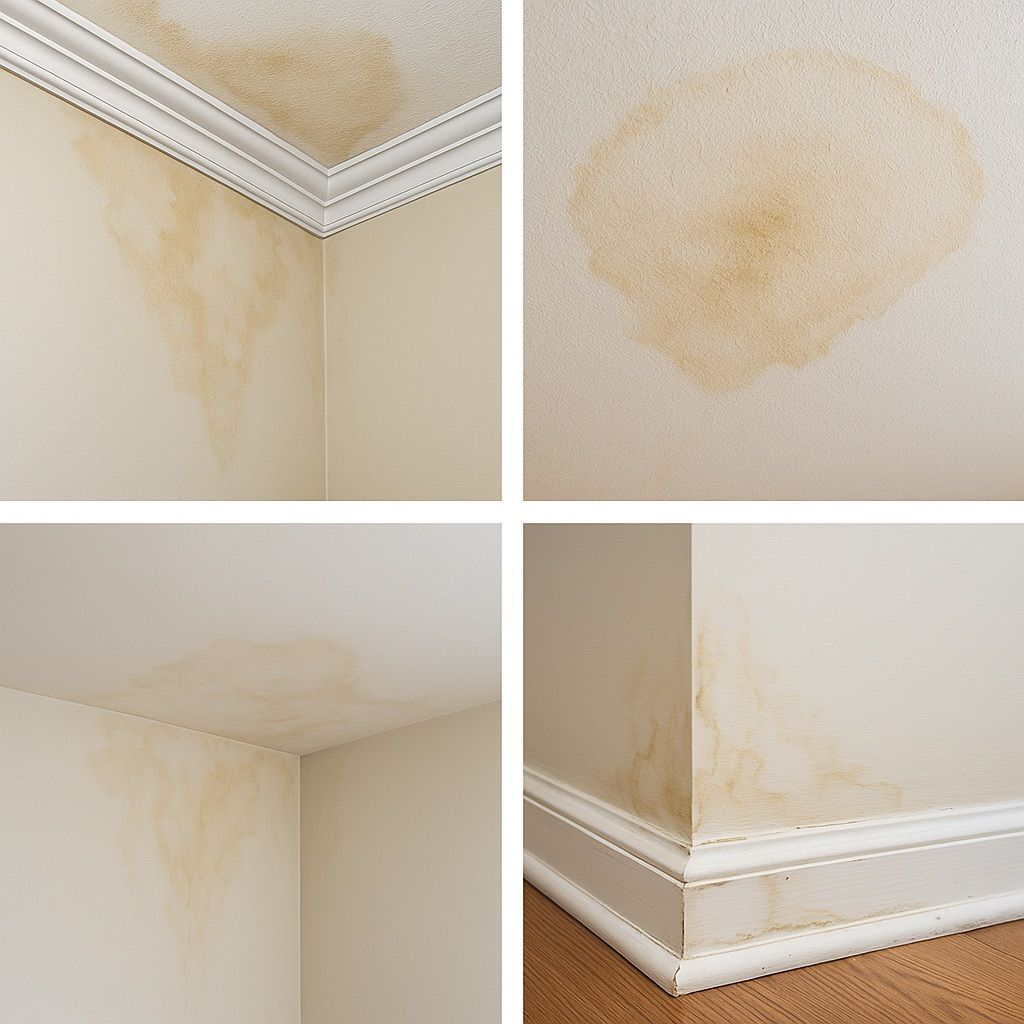
Water stains and ceiling damage are more than just cosmetic issues—they can be signs of serious underlying problems that homeowners in Vero Beach, Wabasso, Orchid Island, and throughout Indian River County need to address quickly. Whether it’s due to roof leaks, plumbing issues, or the effects of Florida’s high humidity and hurricane season, water damage can wreak havoc on your home’s interior finishes. At Reel Painters LLC, we specialize in repairing and repainting water-damaged ceilings, walls, and trim, restoring your home to a fresh, clean, like-new condition—backed by our professional workmanship and local expertise. What Causes Water Stains on Ceilings and Walls? Homeowners in Indian River County often deal with: Leaking Roofs (especially during Florida’s rainy season) Faulty AC Drain Lines or Overflows Plumbing Leaks from Upstairs Units or Bathrooms Storm and Hurricane Water Intrusion High Humidity and Poor Ventilation When water intrudes into your ceiling or wall cavities, it leaves behind yellow, brown, or rust-colored stains, bubbling paint, or soft drywall—especially common in coastal homes near the ocean like those on Orchid Island. Our Process: Repairing Water Damage the Right Way We don’t just paint over it—we fix the root of the problem and ensure your ceiling, walls, or trim are sealed, primed, and protected long-term. Here’s what our Vero Beach water damage repair and painting service includes: Identify the Source - We always start by confirming the water issue is resolved (e.g., roof repaired, leak fixed). Drying and Mold Inspection - If moisture is present, we allow time for drying and check for mold or mildew, especially critical in humid Florida homes. Remove Damaged Material - Damaged drywall, ceiling popcorn texture, or trim is replaced or patched as needed. Stain-Blocking Primer - We use high-quality shellac-based or oil-based primers like Zinsser B-I-N or Kilz Original to seal out water stains permanently. This is a critical step many amateur painters skip. Professional Painting Finish - We repaint the area with premium-grade interior paint, matching your existing color or helping you choose a fresh, updated look. Our finishes are low-VOC and mold-resistant—ideal for homes in Wabasso and Orchid Island. Ceiling & Trim Restoration - Whether it’s crown molding, baseboards, or textured ceilings, we carefully restore and repaint every detail to look factory-finished. Why Vero Beach & Orchid Island Homes Need Extra Protection Homes in Vero Beach, Orchid Island, and nearby areas like Wabasso face unique challenges: Salt air corrosion High humidity year-round Hurricane season from June through November Older construction with outdated drywall and plumbing This makes professional ceiling and wall painting after water damage not just cosmetic—but essential maintenance for property preservation. Popular Finishes & Paints We Use for Ceiling and Trim Restoration Benjamin Moore Ultra Spec or Regal Select for interior walls and trim Sherwin-Williams Duration or ProMar 200 Zero VOC for durable, washable finishes Zinsser Cover Stain / BIN Primer to block tough stains Flat or matte finishes on ceilings for a clean look that hides imperfections Semi-gloss or satin on trim for durability and ease of cleaning Common Customer Questions in Indian River County “Can you just paint over water stains on my ceiling?” No! Not without sealing them first. Water stains will bleed through regular paint unless a proper stain-blocking primer is used. “How much does it cost to fix a water-stained ceiling in Vero Beach?” It depends on the extent of damage, but we offer free estimates and fair pricing. Minor water spot repair and paint touch-ups are affordable—larger repairs involving drywall or trim replacement cost more. “Do I need to repaint the whole ceiling or just the spot?” For best results, especially on flat ceilings, we recommend repainting the full panel or ceiling to avoid noticeable “flashing” or texture mismatches. Why Choose Reel Painters LLC for Water Damage Repair in Vero Beach? Locally owned and operated Fully licensed & insured Experts in stain blocking, drywall repair, and professional finishes Trusted by homeowners in Orchid Island, Wabasso, and Vero Beach 5-star reviews and professional service from start to finish We’re familiar with the unique building styles and construction of homes in your area, from luxury waterfront condos on Orchid Island to historic homes in Wabasso. Our team ensures your home is protected, beautiful, and properly maintained. Service Areas We proudly serve all of Indian River County, including: Vero Beach Orchid Island Wabasso Winter Beach Indian River Shores South Beach Gifford Schedule Your Free Estimate Today Don’t wait for that water stain to spread. Call Reel Painters LLC today at 772-300-6124 or visit www.reelpainters.com to schedule your free in-home consultation. Let us help you protect and beautify your home—one ceiling at a time.
Teak wood is a highly valued hardwood known for its natural durability, water resistance, and beauty. Used extensively in high-end outdoor furniture, decks, docks, and marine applications, teak’s longevity is largely dependent on proper routine care and maintenance. Florida’s intense sun, humidity, and salt air can cause teak to quickly lose its rich golden hue and turn gray, dry, and brittle. Routine cleaning, sealing, and protection are essential to maintain its appearance and structural integrity. ✅ Recommended Teak Maintenance Schedule Task Time Frame (Florida Climate) Light Cleaning Every 1–2 months Deep Cleaning Every 3–6 months Sanding (if needed) Annually or as needed Sealing / Oiling Every 6–12 months (based on exposure) 🧽 Cleaning Guidelines Mild Cleaning: Use a soft bristle brush and a teak-safe cleaner (such as Star brite Teak Cleaner or Golden Care Teak Cleaner). Avoid pressure washing or harsh chemicals like bleach, which can damage the grain. Deep Cleaning: For weathered teak or grayed-out surfaces, apply a teak brightener following the cleaner. Rinse thoroughly and allow to dry for 24–48 hours before sealing. Recommended Products: Star brite Premium Teak Cleaner & Brightener (2-step) Golden Care Teak Cleaner Semco Teak Cleaner (marine-grade) 🛡️ Sealing & Oiling Recommendations After teak is completely dry and clean: Apply marine-grade teak sealer or natural teak oil using a soft cloth or brush. Avoid polyurethane coatings, which can crack and peel under UV exposure. Top Sealer/Oil Products: Semco Teak Sealer (clear or natural tones) Star brite Premium Teak Oil Golden Care Teak Protector •Sikkens Cetol Marine 🔁 Resealing Schedule Teak in Florida’s environment should be resealed every: 6 months for full sun or salt-exposed areas 9–12 months for shaded or partially protected areas Note: After sealing, avoid contact with water for at least 24 hours. 🎯 Our Services Include: Deep cleaning and restoration of weathered teak Surface sanding and brightening Professional application of sealer or oil Ongoing maintenance plans tailored to your community 🏝️ Trusted by Florida Homeowners Reel Painters LLC specializes in wood care solutions for high-end communities along the Treasure Coast. Our team uses only top-tier, environmentally responsible products and time-tested methods to ensure your teak surfaces remain beautiful and protected year-round. 📞 To learn more or schedule a community-wide teak assessment, visit: 🌐 www.reelpainters.com 📩 Email: info@reelpainters.com 📍 Serving Jupiter Inlet Colony and beyond
If you’re a homeowner in Vero Beach, Port St. Lucie, or anywhere along Florida’s Treasure Coast, you’ve probably seen it: paint that fades, chalks, or peels way too soon. The question is—how long should good exterior paint actually last in Florida’s harsh weather? Let’s break it down. Florida’s Weather Is Brutal on Paint Your exterior paint has to survive: High UV exposure year-round Salt air (especially near the coast) Daily humidity and frequent rain Mildew and algae growth Even high-end paint will degrade faster here than in cooler, drier climates. That’s why you can’t cut corners with product choice or prep. How Long Should Exterior Paint Last in Florida? Here’s what we’ve seen with proper prep and high-quality paint like Florida Paints: Stucco & Cement Block: 8–12 years Wood Siding or Trim: 5–7 years Metal Roofs or Gutters: 10–15 years Painted Concrete (driveways, pool decks): 3–5 years Keep in mind: these numbers drop significantly with cheap paint or poor application. Want It to Last? Here’s What Matters: Use Premium Paint We use Florida Paints, made right here in Florida. It’s engineered to withstand salt, sun, and humidity like no national brand can. Proper Surface Prep We start every job with pressure washing, scraping, caulking, and priming if needed. Paint won’t stick without it. Right Paint for the Surface Elastomeric for stucco, acrylic for siding, specialized coatings for concrete and metal. Apply at the Right Time Avoid painting during peak humidity or heavy rain periods. (Yes, we check the forecast!) Real Talk: You Get What You Pay For If your last painter used budget paint or skipped steps, your paint job may have started breaking down in 2–3 years. With Reel Painters LLC, our goal is to give you a finish that looks amazing and holds up for a decade or more. We Know Florida Paint—Because We Live It Our crews paint homes all over Vero Beach, Port St. Lucie, Fort Pierce, and Okeechobee. We only use paints and methods proven to last here. Current Promo: FREE driveway cleaning with any exterior paint project! Schedule Your Free Estimate Today 📲 772-300-6124 🌐 www.reelpainters.com
If you’re looking at your sun-faded or weather-beaten fence wondering whether to paint or stain it, you’re not alone. Homeowners in Vero Beach, Port St. Lucie, and coastal Florida face a unique challenge: Florida’s climate is rough on wood. So which option is better—painting or staining your fence? Let’s compare. What Florida Weather Does to Wood Fences: UV rays bleach and dry out the wood Humidity causes mold and mildew growth Rain and salt air lead to rot and peeling paint Termites and wood-boring insects are everywhere Painting Your Fence: Pros & Cons Pros: Offers a solid, colorful finish Can provide excellent UV protection Easier to match to house trim and style More coverage if your wood is in rough shape Cons: Can peel, bubble, or crack if not prepped correctly Hides wood grain Traps moisture if wood isn’t sealed properly Requires more scraping/repainting over time in Florida’s humidity Staining Your Fence: Pros & Cons Pros: Soaks into the wood and allows it to breathe Shows off the natural wood grain Doesn’t peel—just fades gradually Easier to maintain long-term in humid climates Mold/mildew-resistant if high-quality stain is used Cons: Doesn’t provide as many color options as paint Needs reapplication every 2–5 years depending on exposure Less coverage on heavily weathered or patched fences Our Professional Take for Florida Homes: For most homeowners on the Treasure Coast, we recommend staining over painting—especially if you want a long-term solution with less maintenance. However, painting is great for older fences or when you want to match your home’s style. Either way, Reel Painters LLC can help you choose the right option and apply it properly so it lasts in Florida’s heat, rain, and salt air. We Use: Premium Wood Stains & Sealers designed for tropical climates Florida Paints and other UV- and mildew-resistant coatings Thorough prep: pressure washing, sanding, and sealing as needed Serving Vero Beach, Port St. Lucie, Fort Pierce, and Nearby Areas June Special: FREE driveway cleaning with any fence staining or full exterior painting service! Call for a Free Quote 📲 772-300-6124 🌐 www.reelpainters.com
If you’re looking to refresh your driveway, pool deck, garage floor, or patio, you’ve likely asked: Should I stain it or paint it? The answer depends on your goals, surface condition, and how much durability you need—especially in Florida’s extreme climate. Florida Weather Wrecks Untreated Concrete If left bare, concrete surfaces in Vero Beach, Port St. Lucie, or Okeechobee will: Soak up moisture Grow algae and mildew Crack and stain from oil, rust, and leaf tannins Look dirty and dull all the time So let’s break down concrete stain vs. paint: Concrete Painting – What You Need to Know Pros: Offers solid color and complete surface coverage Can be customized with patterns or textures (great for pool decks!) Hides imperfections in rough or old concrete Slip-resistant finishes available Cons: Sits on the surface, so it can peel or flake over time Requires proper prep: cleaning, etching, and sometimes primer May need reapplication every 2–5 years depending on use and weather Best For: Driveways, garage floors, patios, pool decks with wear and tear Concrete Staining – What You Should Know Pros: Penetrates the concrete for a more natural look Won’t peel or chip—it fades gradually Enhances concrete’s natural patterns Looks high-end with earthy, stone-like tones Easier long-term maintenance Cons: Less color control; can’t hide major surface flaws Doesn’t provide as much UV protection as paint Requires sealing to maintain look and prevent moisture damage Best For: Newer concrete patios, decorative walkways, customers who want a natural finish What We Recommend at Reel Painters LLC We help homeowners choose the right system based on use, traffic, and finish preference. We only use professional-grade stains and paints built for Florida’s moisture, heat, and UV intensity. All surfaces are: Pressure cleaned Prepped and etched if needed Sealed with a protective topcoat to prevent fading, mold, and peeling Proudly Serving: Vero Beach | Port St. Lucie | Fort Pierce | Okeechobee | Palm Bay